Feeds:
Posts
Comments

Posts Tagged ‘cooking’

After ditching the terrible kitchen that I gladly left behind in Mobile (huge room, no counter space, two outlets on walls spaced some 20 feet apart), I enjoyed the large expanse of a kitchen built in the late 90s, complete with tons of cabinet space. Pure suburbia.

I didn’t exactly get along with pure suburbia, however, and ended up in a medium-sized condo in Midtown Atlanta with a decidedly NOT medium-sized kitchen.

I like it. I donated the china that I’ve been packing around for nearly 20 years (china that was meticulously packed away in my paternal grandmother’s home, so don’t worry that I’ve thrown away some sort of beloved family legacy). I need one more smallish cabinet to keep my own wedding china, which is actually pottery, but other than that a smaller kitchen is definitely working for me. Less to dirty, less to clean up. Less cabinet space to attract stuff that has nothing to do with food prep.

On a recent trip to London and Paris (I’m not going to call it a once-in-a-lifetime vacation, because I fully intend to go back, but yeah, it was a big deal), I realized how much less kitchen I could live without. We stayed in apartments in both cities, beginning with a laughably tiny kitchenette in Chelsea:

kitchen

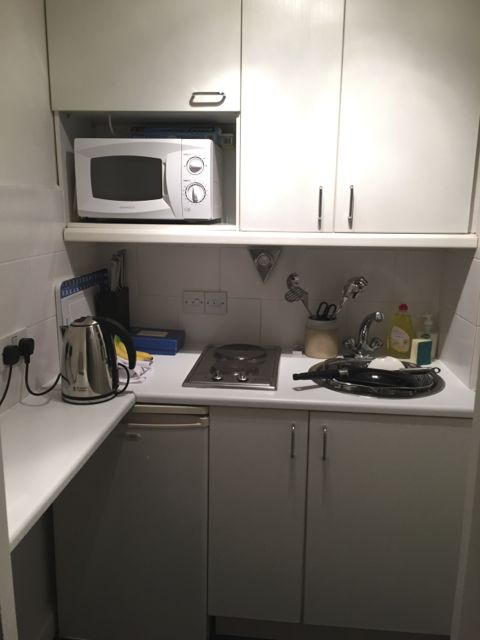
It really took the concept of “no counter space” to a whole new level, but it worked. We boiled pasta and heated sauce for Christmas dinner, and we scrambled eggs one morning. We also had a water kettle, microwave and toaster, meaning we could easily make coffee (via French press) and tea, plus warm up the occasional sandwich or other bakery treat.

In Paris, we added a dishwasher and slightly more counter space to our cooking area:
kitchen2

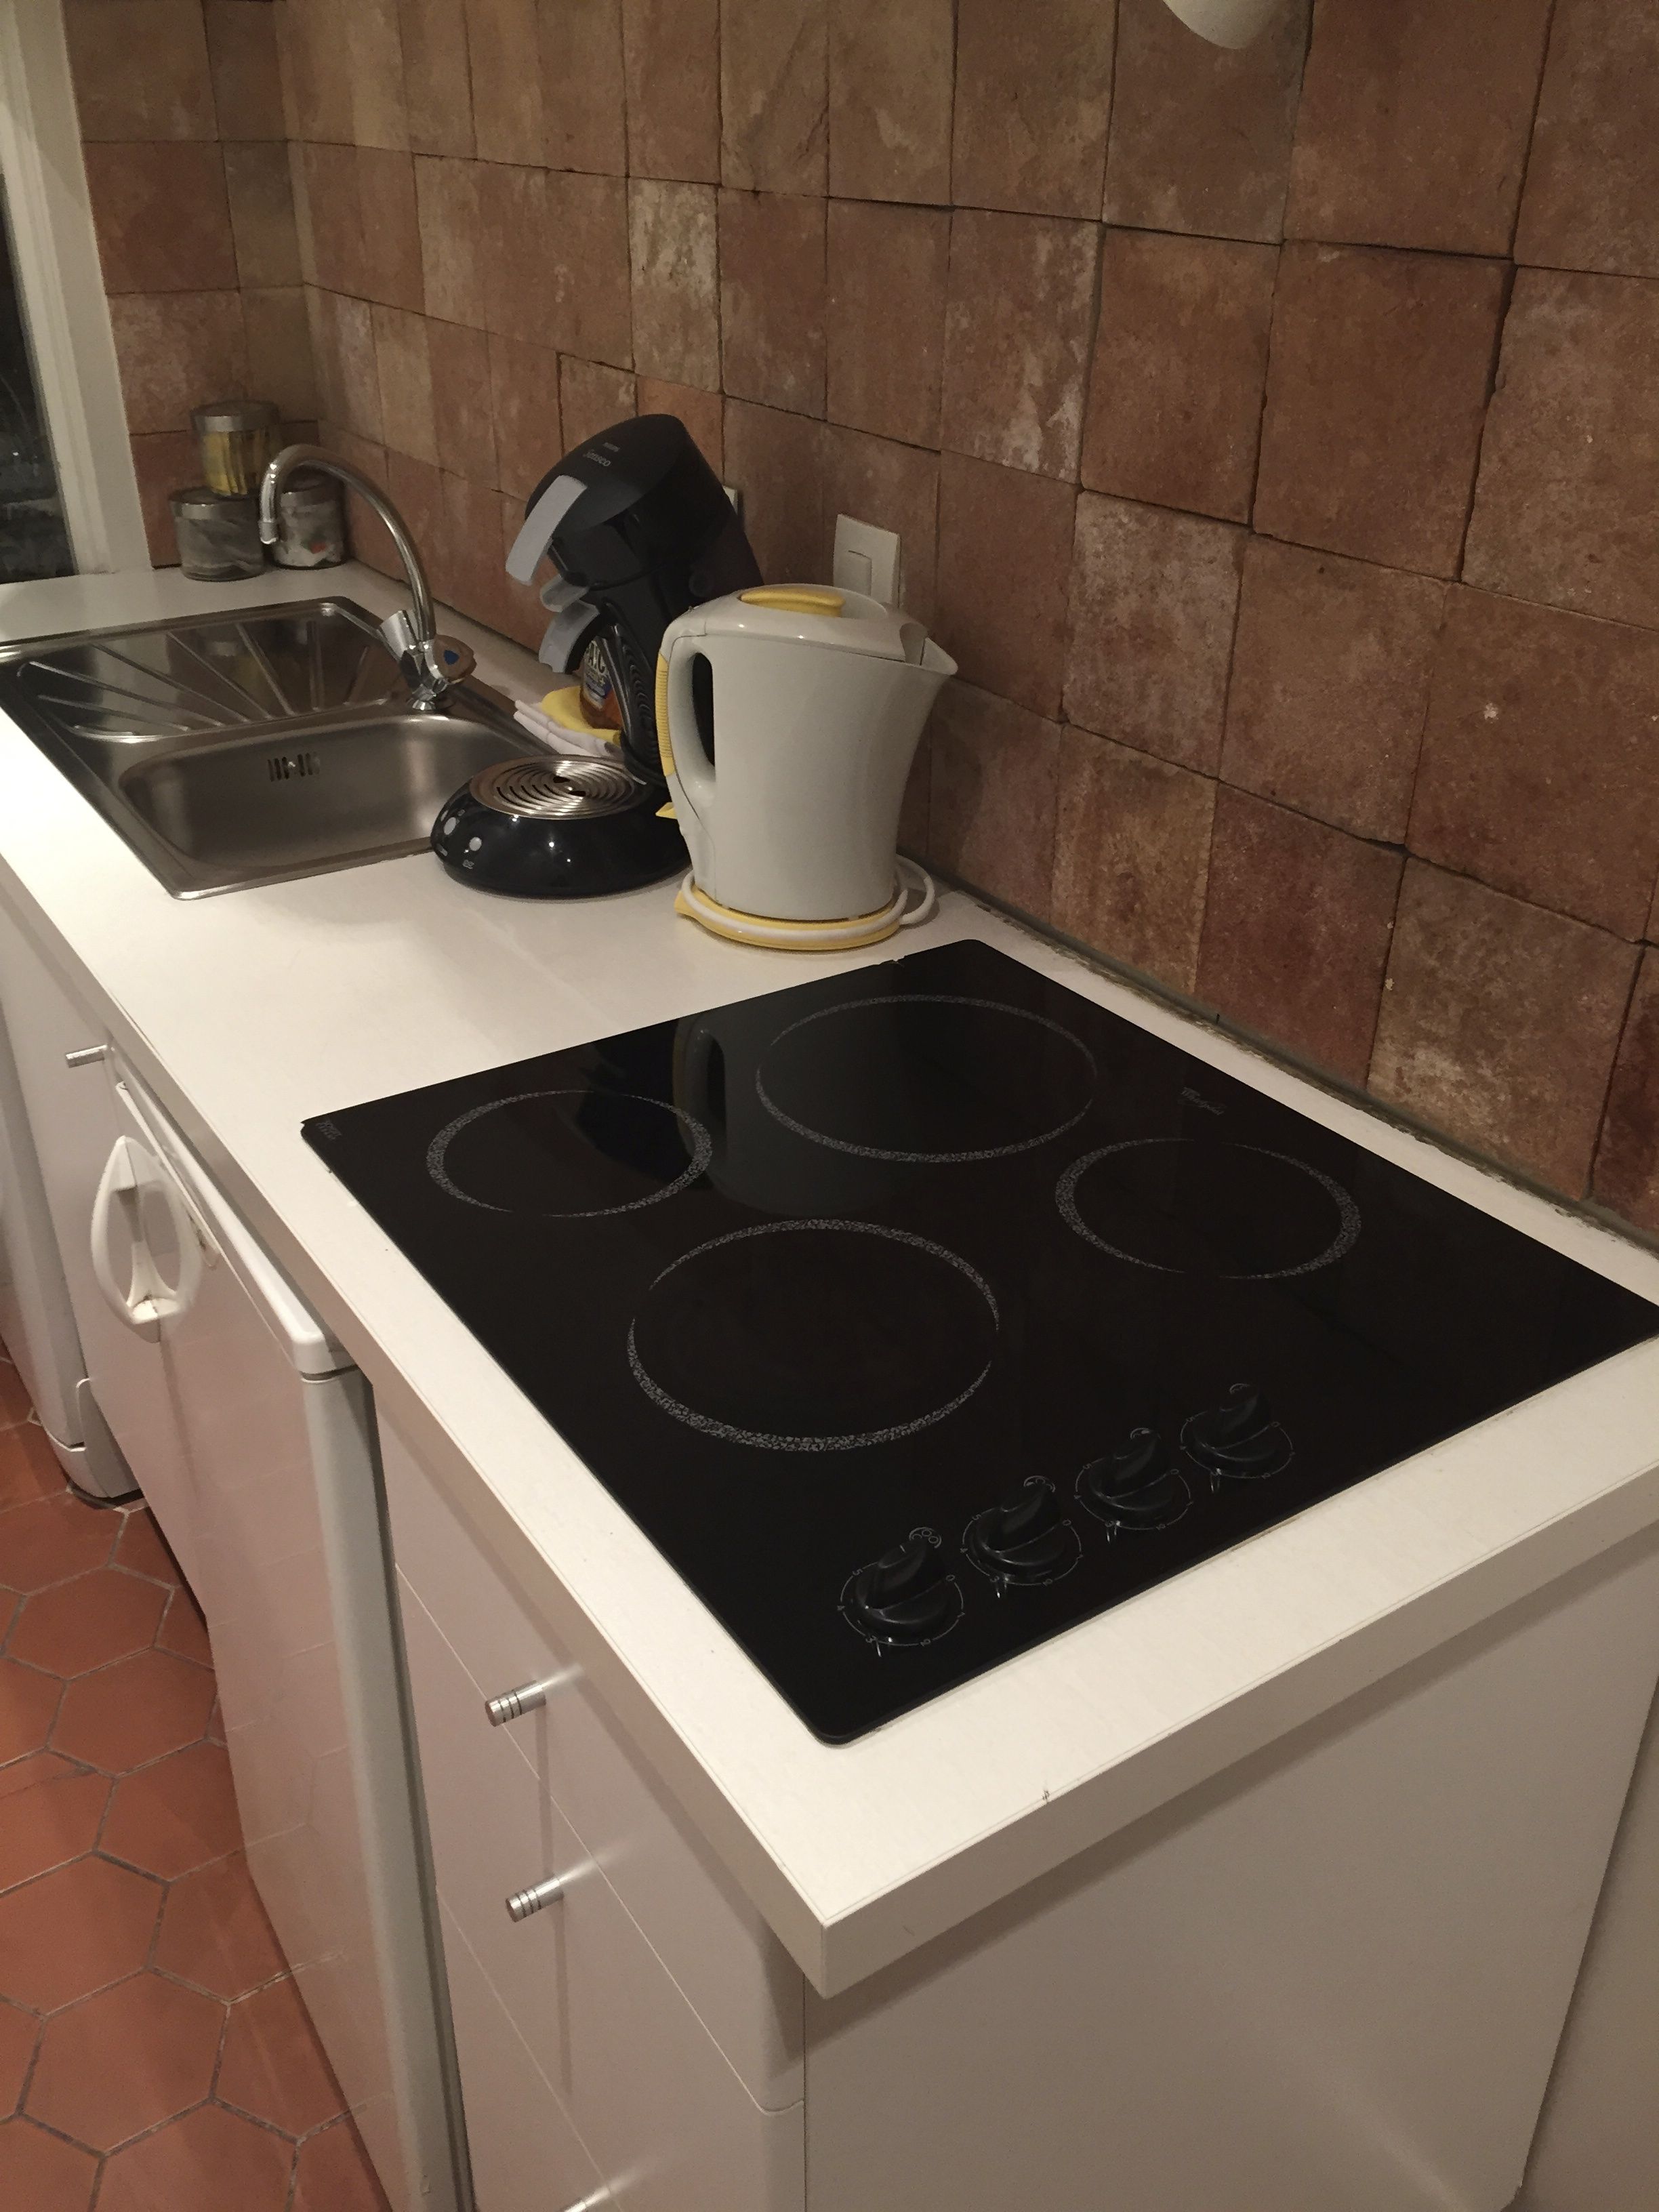
I think the most complicated thing I made here was oatmeal (dozens of authentic French bakeries within walking distance does not prompt a girl to break out the pots and pans). I also enjoyed the kitchen’s Nespresso Senseo coffeemaker, which I was disappointed to learn is no longer sold in the United States. While I hold anything involving K-cups in utter disdain, I could live with coffee made from those little filter packets every last day.

So much more to talk about from this trip later. Right now, I have to go enjoy the wide-open spaces of my tiny condo kitchen.

Read Full Post »

After four summers of putting up with the squash in my CSA box, I have, at last, found a reason to love the stuff.

My habit of perusing stacks of used books finally paid off during a spring visit to Nashville’s BookManBookWoman, which yielded a copy of Cover & Bake by the Cook’s Illustrated team. I’ve found the Cook’s Illustrated collections to be virtually foolproof — they do, after all, painstakingly test each recipe numerous times before releasing it into the wild.

I grew up with very little respect for the squash. I remember eating it mostly fried, although surely that wasn’t the only way my mother and grandmother prepared it. The only thing I really figured out to do with it myself was to chop it up and sauté it with a little garlic and olive oil. Passable, but by no means a method to use up copious amounts of squash.

This recipe, however, uses 2 entire POUNDS of squash, meaning I haven’t spent the last two weeks feeling bad about unwanted veggies languishing in the crisper. They’re all gone.

The original recipe specifically calls for zucchini and summer squash. I was saving my zucchini for brownies (I’ll share that recipe soon — seriously the best brownies ever), and I had at least three other varieties of squash in the box, including Slick Pik, Zephyr and patty pan.

Squash is squash, I say. I also substituted chopped leeks for the shallots, since I had leftover leeks and the Internet vaguely signaled that they would be OK. No complaints.

I also never bother keeping parsley in the house, so I used an entire cup of chopped basil instead of buying a whole bunch of parsley just for 1/4 cup.

This recipe is a lot of work, to be sure, but totally worth it. The creamy sauce delivers a consistent hint of fresh basil, and every forkful delivers a healthy array of veggies.

Baked Penne with Squash, Tomatoes and Basil
(Adapted from Cook’s Illustrated)
Serves 6 to 8

Topping
4 slices white sandwich bread, torn into pieces
2 tbsp. unsalted butter, melted

Filling
2 pounds zucchini and/or other squash varieties, halved lengthwise, sliced 1/2-inch thick
Kosher salt
3/4 lb. penne
4 tbsp. olive oil
6 medium shallots, minced (about 1 cup)
4 medium garlic cloves, minced
1/4 cup all-purpose flour
2 1/2 cups low-sodium chicken broth
1 1/2 cups heavy cream
2 oz. Parmesan cheese, grated (about 1 cup)
3/4 cup chopped fresh basil leaves
1/4 cup chopped fresh parsley leaves
Ground black pepper
1 pint cherry tomatoes, quartered

For the topping:
Process the bread and butter in a food processor fitted with the steel blade until coarsely ground, about six 1-second pulses; set aside.

For the filling:
1. Toss the squash with 1 tbsp. kosher salt and place in a large colander set inside a large bowl to drain, about 30 minutes.
2. Bring 4 quarts of water to boil in a Dutch oven over high heat. Stir in 2 tbsp. kosher salt and the pasta; cook, stirring occasionally  until al dente. Drain the pasta, return to the pot, and toss with 1 tbsp. of olive oil; set aside. Adjust oven rack to the middle position and heat to 400 degrees.
3.  Spread the salted squash evenly over a double layer of paper towels and pat dry with additional paper towels, wiping off any residual salt. Heat 1 tbsp. olive oil in a 12-inch nonstick skillet over high heat until smoking. Add half of the squash and cook, stirring occasionally, until golden brown and slightly charred, 5 to 7 minutes. Transfer to a baking sheet. Add 1 tbsp. olive oil to the pan and return to high heat until smoking; brown the remaining squash and transfer to the baking sheet.
4. Wipe the skillet clean with a wad of paper towels. Add the remaining tablespoon of olive oil and return to medium-high heat until shimmering. Add the shallots and cook until softened, about 3 minutes. Add the garlic and cook until fragrant, about 30 seconds. Add the flour and cook, stirring constantly, until golden, about 1 minute. Off the heat, stir in the Parmesan, basil and parsley. Season to taste with salt and pepper.
5. Add the sauce, tomatoes and sautéed squash to the pasta; stir gently to combine. Pour the pasta into a 9-by-13-inch baking dish  and sprinkle with the breadcrumb topping. Bake until the casserole is bubbling and the crumbs are lightly browned, about 15 minutes. Serve immediately.

Read Full Post »

The Bodum Bistro Universal Knife Block: definitely on my list of Favorite Things right now.

The new cookware we bought a couple of years ago came with a set of really groovy, really sharp knives.

I began using them in place of the set of less exciting knives that have been getting duller by the minute in their wooden block ever since someone gave them to us nearly two decades ago.

Where do you keep loose knives, especially when you want them to keep their edge? I was reduced to keeping these in the silverware drawer and trying to keep them from butting into each other.

I really like the look of a magnetic knife rack, but I don’t trust Yang, despite his advanced age, not to go smacking shiny knives off the wall in the middle of the night.

Amazon.com to the rescue. I found the Bodum Bistro Universal Knife Block during my search for a solution. It’s STUNNING, and it takes up next to NO room on the countertop. I love the bold color (it was, at some point, also available in black, orange and lime green), and the functionality can’t be beat. It contains hundreds of narrow plastic sticks, which allow the knives (and scissors) to easily slide into place. My largest knife is too tall to drop in vertically, but it goes in quite neatly at a slight angle.

A view from the top: Although it currently houses only three knives and a pair of scissors, the Bodum knife block has plenty of room for more occupants.

At nearly $50, it was a bit of an indulgence, but what’s better than an indulgence that actually solves a problem?

Read Full Post »

So it turns out that strawberry shortcake is NOT simply strawberries with pound cake, angel food cake or sponge cake (no, not even those perfectly round little sponge cakes sold in packs of six in your grocery store’s produce section).

The shortcake you likely remember from your childhood? An imposter.

Shortcake is its very own thing. Simply placing strawberries and whipped cream (or, more likely, Cool Whip) on top of any kind of cake does not magically turn it into shortcake. (And while I’m on the subject of Cool Whip, how is it that nobody ever told me how EASY it was to make your own whipped cream?)

Shortcakes are essentially biscuits made with butter instead of shortening, with just a hint of added sugar. They’re supposed to accent the strawberries, after all, not compete for the title of sweetest dessert element.

I’ve made the Cook’s Illustrated version of strawberry shortcake a couple of times, and it’s a winner. The shortcakes are light, but substantial enough to hold the juicy berries without falling apart. The strawberries themselves could probably do with a little less added sugar, especially if you’re lucky enough to get specimens as sweet as I’ve found at the Dennison’s Family Farm strawberry stand this year. The recipe makes way more shortcakes than two people need, but the leftover cakes are good for a couple more days and you can make half, a third or even a quarter of the whipped cream recipe if you like.

Strawberry Shortcake

  • 8 cups (about 2.5 lbs.) strawberries, hulled
  • 6 Tbsp. sugar
  • 2 cups (10 ounces) all-purpose flour (plus more for dusting the work surface and biscuit cutter)
  • 5 Tbsp. sugar
  • 1 Tbsp. baking powder
  • 1/2 tsp. salt
  • 1 stick (8 Tbsp.) cold unsalted butter, cut into 1/2-inch cubes
  • 1 large egg, lightly beaten
  • 1/2 cup plus 2 tsp. half-and-half
  • 1/2 tsp. vanilla extract
  • 1 large egg white, lightly beaten
  • 2 cups whipped cream

For the strawberries:
Place 3 cups of the hulled strawberries in a large bowl and crush with a potato masher. Slice the remaining 5 cups berries and stir into the crushed berries along with the sugar. Set the fruit aside to macerate for at least 30 minutes or up to 2 hours. (Note: Our leftover macerated strawberries were good for three more days.)

For the shortcakes:
Adjust an oven rack to the lower-middle position and heat the oven to 425 degrees. In a food processor, pulse the flour, 3 Tbsp. of the sugar, the baking powder, and salt to combine. Scatter the butter pieces on top and process until the mixture resembles coarse meal, about fifteen 1-second pulses. Transfer to a medium bowl.

Mix the beaten egg with the half-and-half and vanilla extract in a measuring cup. Pour the egg mixture into the bowl with the flour mixture. Combine with a rubber spatula until large clumps form. Turn the mixture onto a floured work surface and lightly knead until it comes together. (Note: I’m not sure how I avoided screwing this up, given my lack of prowess with bread dough. It was a sticky mess, but I somehow managed to work enough extra flour in to make it work without ruining it. The husband has mad dough-making skills, so I should probably convince him to handle this part.)

Use your fingertips to pat the dough into a 9-by-6-inch rectangle about ¾-inch thick, being careful not to overwork the dough.

Flour a 2¾-inch biscuit cutter and cut out 6 dough rounds. Place the rounds 1 inch apart on a small baking sheet, brush the tops with the beaten egg white, and sprinkle with the remaining 2 Tbsp. sugar. (Dough rounds can be covered and refrigerated for up to 2 hours before baking.) (The recipe notes that you can roll up the leftover dough scraps and make more shortcakes, but warns that they may not be as good as the originals. I detected no difference, so use all of your dough.)

Bake until the shortcakes are golden brown, 12-14 minutes. Place the baking sheet on a wire rack and cool the cakes until warm, about 10 minutes.

To assemble:
When the shortcakes have cooled slightly, split them in half. Place each cake bottom on an individual serving plate, and spoon a portion of the fruit and a dollop of whipped cream over each cake bottom. Cap with the cake top and serve immediately.

Whipped Cream 
Makes about 2 cups

  • 1 cup heavy cream, cold
  • 1 Tbsp. sugar
  • 1 tsp. vanilla

Chill a deep, non-reactive, 1- to 1.5-quart bowl and beaters in the freezer for at least 20 minutes. Put all ingredients in bowl and beat on low until small bubbles form, about 30 seconds. Increase speed to medium and beat until beaters leave a trail through the mixture, approximately 30 seconds more. Beat on high until the whipped cream is smooth, thick and nearly doubled in volume, about 20 to 30 seconds. (Note: Don’t skimp on freezing the bowl and beaters. That’s what makes the magic happen.)

Read Full Post »

A few years ago, I discovered that cooking is a lot like painting: The more work you put into a project before you start, the smoother everything goes once you begin.

I had always noticed that people on cooking shows had premeasured ingredients at the ready, but I figured they needed to do that so the camera didn’t have to follow the mundaneness of the measuring process. At some point, however, I realized that premeasured additions made a lot of sense. What’s easier: Scooping out various amounts of spices while standing at the stove at the very moment those ingredients need to be added to your concoction, repeatedly glancing back at the recipe, or measuring out all of those ingredients before you start so you can dump them in at the appropriate time, all at once and with no double-checking of the recipe?

A lot of the recipes I frequently use call for tiny amounts of ingredients, meaning it was hard to justify dirtying even my smallest bowls for premeasuring. I had been using wax paper for these smaller measurements, but tearing tiny squares off the roll made for an untidy rectangle when I would finally need a larger piece.

IKEA to the rescue. During my going-away trip to the Atlanta megastore, I stumbled across the BLANDA bowls. At $2.99 for a pack of four, these 2-inch bowls are the perfect size for my small additions of herbs and spices. One bowl will hold approximately four minced garlic cloves (provided, of course, that you haven’t been tricked into buying some monstrous head of garlic with supersized cloves) and maybe 4 teaspoons of herbs and spices.

I almost bought the stainless steel version ($4.99 for four), but I could tell that they were going to scratch easily, since every package I picked up sported at least one bowl that was already pretty roughed up.

So far, the most bowls I’ve used at one time is three. I took the photo above during Cinco de Mayo’s fajita-making festivities; one holds minced garlic, another holds oregano and thyme, and the third holds salt and pepper. All in all, probably not that much to measure out midway through the cooking process, but dumping a tiny bowl of premeasured ingredients into a pan filled with sizzling onions makes me feel like I should have my own cooking show.

Iron Chef Haggerty. I like it.

Read Full Post »

Nanny in her natural habitat: the kitchen.

I realized this weekend that I have successfully made a souffle, but can’t make a fried egg.

My grandmother made delectable fried eggs, and made it look easy. The everyday breakfast options at her house included bacon (turkey bacon after my grandfather’s heart problems were diagnosed), toast (or biscuits, on occasion) and eggs, either scrambled or fried (note: fried eggs, over easy, became known as Paw-Paw eggs, because they were his favorite, and to this day I can barely order them in a restaurant without calling them by this nickname).

I should have paid more attention, I guess. I should have offered to cook the eggs instead of going for the easy job of making toast or microwaving turkey bacon. (Or making the grits. I can’t believe I forgot about the grits option.)

I might not even have this ongoing fear of cast-iron skillets.

Read Full Post »

I’ve spent the last five years trying to figure out how the heck side-by-side refrigerators got so popular in the ’80s.

I grew up thinking my family, with our old-fashioned one-door, freezer-on-top model, was missing out, that somehow the families with side-by-sides were enjoying better meals and tastier snacks. They were certainly enjoying hipper, more modern kitchens.

Oh, the misguided assumptions of youth. I finally got my new-fangled side-by-side refrigerator when we moved to Huntsville (at the same time, I might add, that the hippest homeowners were purchasing refrigerators with French doors and freezer drawers on the bottom).

I quickly ascertained that side-by-sides are virtually useless for anyone who actually wants to USE a refrigerator. I was constantly rearranging things to try to make other things fit. The freezer was a disaster, with two extremely deep, extremely narrow drawers that quickly turned into a tumbled mess of freezer bags and containers no matter how careful I was to try to keep them organized, and shelves that were difficult to navigate despite their small size.

Organizing the refrigerator shelves was like playing a game of culinary Tetris. A gallon of milk and a container of orange juice was pretty much all the top shelf could handle. My love for greens fresh out of the salad spinner required a dedicated bottom shelf. The small salad spinner, mostly reserved for fresh herbs, sometimes had to reside in the crisper, a problem given that the drawer usually already contained an array of veggies.

We never got around to getting another one, partly because someone had kindly custom-built the cabinets around the refrigerator, severely limiting the potential replacement models.

Now that I’m in Atlanta, I’m once again living with an old-school, freezer-on top refrigerator with one non-French door. Only this time, I’ve decided that old-school is pretty awesome.

The refrigerator shelves offer wide, open spaces — currently, the salad spinner is residing alongside half a gallon of milk, a carton of goat cheese AND a jar of jelly. The freezer’s a huge open space — no shelves, but a couple of small plastic boxes can help sort a LOT of frozen foods. It even has a working ice maker, an innovation that I have, until now, not enjoyed in my own home.

The whole setup is so much more usable than the side-by-side that I’m not even curious about freezer drawers on the bottom anymore. I just want space that makes sense.

I guess the moral of this post is to be careful what you wish for, because you might be stuck cursing at it for five long years when you finally get it.

Read Full Post »

Don’t let the name of her blog fool you: Kristen over at Crafty Kristen has a heck of a green thumb in addition to mad knitting skills.

She gifted me with a couple of bags filled with goodies from her garden recently as she was preparing to go spend a few days at the beach with her husband. I brought home yellow pear tomatoes (sweet and delicious), cherry tomatoes and eggplants.

Totally exotic eggplants.

The only eggplant I’m familiar with is the big purple one. I remember seeing them when I was a kid, although I don’t recall whether my grandparents grew them, and I don’t remember ever eating them until I tried the ever popular eggplant Parmesan in college. I certainly never cooked an eggplant myself.

So when a CSA box arrived a couple of years ago with an eggplant inside, I faced a quandary. I made a baked version of eggplant Parmesan first — it was delicious, but not quite delicious enough to make up for the time it required and the mess it made.

I finally found an easier eggplant pasta sauce recipe with a complex, garlicky flavor. It took care of the huge purple eggplants in the CSA box, and made enough that I had leftovers for at least a couple of days.

Pre-eggplant season, Kristen had recommended a recipe for Pasta alla Norma, which I tucked away on Pinterest in anticipation of this year’s first CSA box.

When she handed me a small plastic bag filled with the fanciest eggplants I had ever seen, I knew I couldn’t simply smash them into the gray (yet tasty) pulp resulting from my go-to eggplant pasta sauce recipe.

So I broke out the pasta alla Norma recipe, only to discover three problems:

  • It called for ricotta salata cheese, which I wasn’t entirely sure I could find at Publix.
  • It called for deep-frying the eggplant, while I’m really more of a “lightly sauté” kind of girl.
  • It called for sautéed onions WITHOUT sautéed garlic. Say what now?

I made a few simple changes to the recipe and was psyched about the results. The sauce is very light, but the eggplant makes it filling. I found it made enough for two servings (I only cooked 2.5 ounces of penne rigate), with enough left over for lunch (no pasta, just the chunky sauce).

You have to judge how much basil, eggplant and Parmesan cheese to use. If you want a heartier sauce, use more eggplant. Need more basil flavor? Tear up a few more basil leaves. It’s a forgiving recipe.

Pasta alla Norma

Makes about 3 servings

(Adapted from David Rocco’s recipe)

  • 2.5 oz. penne rigate pasta
  • olive oil
  • 1/2 white onion, chopped
  • 14 oz. diced tomatoes
  • salt and freshly ground black pepper, to taste
  • 1 medium-sized eggplant (or a few small eggplants), cubed
  • fresh basil leaves, torn
  • Parmesan cheese

Cook the penne in a pot of boiling salted water, stirring to prevent it from sticking together. While the pasta is cooking, make the sauce.

In a saucepan, heat up a tablespoons of olive oil. Gently sauté onions until tender, then add undrained tomatoes. With the back of a wooden spoon, break up the tomatoes into small chunks.

Add salt and pepper. Cook for a few minutes until the sauce has thickened.

In another pan, sauté the eggplant in olive oil until golden. Add the sautéed eggplant and basil leaves to the sauce, and stir in a few sprinkles of Parmesan.

Plate the servings of pasta and spoon sauce on top. Sprinkle with more Parmesan, if desired, and serve immediately.

Read Full Post »

Cucumbers, squash, lemon cucumbers, green tomatoes, more squash (sigh) and red noodle beans.

This week’s CSA box was heavy with a little bit of everything.

I faced two unfamiliar items: lemon cucumbers and red noodle beans. The lemon cucumbers are round and a little sweeter than other varieties, and the red noodle beans were tasty but weird.

I riffed on this recipe for Red Noodle Beans with Cracked Black Pepper, only I didn’t have any soy sauce, and I forgot that I just received a couple of bell peppers, so I pretty much just sautéed them in olive oil with diced onion and garlic for about 10 minutes. They tasted like string beans, more or less, except they were squeaky, like cheese curds.

Like I said, tasty but weird.

The box also contained one lone cherry tomato, only I thought I saw two cherry tomatoes, so I ate it expecting to dig the other one out for the husband in a few minutes. Alas, no. I scarfed down the only one. Lucky for me, he’s the forgiving type, and he doesn’t have the same extreme craving for homegrown tomatoes that I do.

Sweet onion, bell peppers, basil, the biggest eggplant I’ve ever had and various hot peppers.

Read Full Post »

I was excited and a little leery when I found a bagful of fresh English peas in my latest CSA box.

As confirmed by my CSA representative, English peas are extremely sensitive to hot weather, so they would have never had a chance on my grandparents’ farm in South Mississippi. Therefore, the only English peas I’ve ever eaten have come straight out of the can, slightly mushy and pretty bland. Meh.

Since the record-breaking heat in North Alabama/South Tennessee was making it clear that this would be the only fresh English peas I would get this year, I knew I had to make the most of them.

I don’t mean this as an insult to my Southern ancestry, but at some point cooks in the South started boiling vegetables into a salty mush. I remember the first time I ever had a string bean that had been briefly steamed, and thus still held a bit of natural sweetness and a light crunch. (Truly, it would have been considered underdone at my grandmother’s house.) Corn on the cob became a whole new experience for me when I discovered that I could simply wrap individual ears in waxed paper and microwave them for a few minutes, leaving sweet and crunchy kernels that needed neither salt nor butter.

I was determined not to turn these peas into mush.

I found inspiration at Williams-Sonoma’s website: Sautéed English Peas with Garlic and Sesame. Unfortunately, I didn’t have sesame seeds or sesame oil in my pantry, so I had to wing it. I also don’t know how many pounds of peas I started with; Williams-Sonoma recommended two garlic cloves for 3 pounds of unshelled English peas. Do the math for the amount of peas you have, or just use a couple of cloves of garlic.

There are few vegetable recipes that wouldn’t be made better with a couple of cloves of garlic.

The husband was at first stunned by the color of the peas when I removed the lid from the pan; the short cooking time had left the peas a brilliant green. The texture was magnificent; they weren’t crunchy or chewy, but they weren’t mushy either. The garlic flavor burst through with every bite, but not in an overwhelming way.

Sautéed English Peas with Garlic

  • Fresh English peas, shelled
  • 2 cloves garlic, minced
  • 1 tbsp. olive oil
  • Pinch of sea salt
  • Pinch of freshly ground pepper

Bring a large pot of salted water to a boil. Fill a large bowl 2/3 full with ice water. Add the peas to the boiling water and cook for 3 minutes. Drain the peas and immediately plunge them into the ice water. Let stand for two minutes and drain.

In a large frying pan over medium-high heat, heat the olive oil. Add the garlic and sauté, stirring constantly, until it is fragrant but not brown, about 30 seconds.

Add the peas, salt and pepper, and sauté, tossing and stirring occasionally, until the peas are just tender, 4 to 5 minutes. Taste and adjust the seasonings. Serve immediately.

****************

Yang hasn’t given up his photobombing duties; here, he inspects the bowl of English peas mid-shoot.

Read Full Post »

Older Posts »

%d bloggers like this: